Step through the prompts.
http://www.onecomputerguy.com/windowsxp_tips.htm#svchost
^^^ That link is still active as of 6/14/2024
(Note: Support for MRT under Server 2003 and WinXP has long since ended. You can download the 32-bit installer but it will not run in those environments.)
From a command prompt run:
MRT
Step through the prompts.
From a command prompt type:
SFC /scannow
DISM /Online /Cleanup-image /Restorehealth
The above command repaired a situation in Server 2012 with a runaway CPU
usage problem from the
.NET Runtime Optimization service going bonkers. SFC didn't see it but
DISM repaired it.
For more DISM options (i.e. repairing an installation from a remote computer's Windows\WinSxs folder), see below.
Symptom: Windows Update will not run / high CPU usage.
Repair corrupt installation files in WinSxS folder:
From install DVD
DISM /online /cleanup-image /restorehealth /Source:D:\sources\sxs /LimitAccess
From another installation (with drive x: mapped to the Windows
directory):
DISM /online /cleanup-image /restorehealth /Source:x:\Winsxs /LimitAccess
(where x:\Winsxs is the mapped drive letter of the
remote computer's Windows folder)
After the corruption is fixed, Stop the Windows Update
service (in Services.msc) and rename or delete the SoftwareDistribution
folder under Windows.
Example: C:\Windows\SoftwareDistribution (rename it to
SoftwareDistribution.old or simply delete the folder.)
Then Start the Windows Update service (again, using Services.msc)
Note: This syntax is specific to Windows Server 2012 but is applicable to other versions as well.
Read the web page (below) that tells how to install this product on Server
2012.
After setting compatibility to Windows 7, from an
elevated command prompt type:
mseinstall /disableoslimits
Install, Update, then run the application.
Download the app here
https://www.rootusers.com/how-to-install-microsoft-security-essentials-in-windows-server-2012-r2/
Edit:
HKEY_Current_User\ControlPanel\Keyboard\InitialKeyboardIndicators
Type REG_SZ:
If set to 0, NumLock is disabled for that current user after logging on. If it is 2, NumLock is enabled and will retain the settings from the last shutdown.
If you have a service or device driver that you want to remove:
In Control Panel /Services or /Devices, located the object and STOP it (if it is started). If it won't STOP, configure StartUp as Disabled and reboot.
Edit: HKEY_LOCAL_MACHINE\SYSTEM\CurrentControlSet\Services
Locate the object, highlight it, delete it.
(This is for NT 4.0)
The PostOffice is in a directory called WGPO.
To move it:
Move it (and all the subdirectories) to a new location which is shared with
"Full Control".
Edit: HKEY_CURRENT_USER\Software\Microsoft\Mail\Microsoft Mail
Double click ServerPath and change it to the new WGPO location.
If you have WFWG or W95 users, change the ServerPath= in their MSMAIL.INI.
To start over (delete it):
Delete the WGPO directory
Edit: HKEY_CURRENT_USER\Software\Microsoft\Mail
and delete the Microsoft Mail Sub Key.
To display a shutdown button at Login, edit:
HKEY_LOCAL_MACHINE\SOFTWARE\Microsoft\Windows NT\CurrentVersion\Winlogon
Value: ShutdownWithoutLogon REG_SZ 0 or 1
When this value is set to 1, you can select Shutdown from the Welcome dialog box. If the value is 0, the Shutdown button does not appear.
If you want to autolog a user, both TweakUI and the Resource Kit utility AUTOLOG.EXE will do it for you. To configure this using the registry, edit:
HKEY_LOCAL_MACHINE\Software\Microsoft\Windows NT\CurrentVersion\Winlogon
Set the DefaultDomainName, DefaultPassword (must be non-blank), and DefaultUserName. Set AutoAdminLogon to 1 (all are type REG_SZ). If you ever want to logon as a different user, hold down the shift key as you logoff.
HKEY_CURRENT_USER\Software\Microsoft\Ntbackup\User Interface\
Skip open files: this type REG_SZ has 3 possible settings:
0 = do not skip, wait
1 = skip files that are opened unreadable
2 = wait on open files for Wait time
Wait time: this type REG_SZ has a range from 0 to 65535 seconds with a default of 30 seconds.
If you have a PS/2 Wheel Mouse without special driver, and the wheel is not
functional, it is probably not being detected. Browse to:
HKEY_LOCAL_MACHINE\SYSTEM\CurrentControlSet\Services\i8042prt\Parameters
Edit or Add Value name EnableWheelDetection, a type REG_DWORD, and set the data to 2.
(0 = Never detect wheel mouse, 1 = Auto-detect, 2 = Always detect)
Restart your computer.
HKLM\Software\Microsoft\Windows\CurrentVersion\Explorer\MountPoints\_WantUI
Delete the drive letter(s) you don't want to popup.
http://www.ss64.com/nt/slow_browsing.html
(Lots of good stuff)
To increase the number of files that you can download at one time to 10, follow these steps:
1) Start Registry Editor.
2) Locate the following key in the registry:
HKEY_CURRENT_USER\Software\Microsoft\Windows\CurrentVersion\Internet Settings
3) On the Edit menu, point to New, click DWORD Value, and then add the following registry values:
Value name: MaxConnectionsPer1_0Server
Value data: 10
Base: Decimal
Value Name: MaxConnectionsPerServer
Value data: 10
Base: Decimal
4) Exit Registry Editor.
5) Restart Windows
Yes, if you look under C:\Documents and Settings\All Users\Application Data\Malwarebytes\Malwarebytes' Anti-Malware in XP and C:\ProgramData\Malwarebytes\Malwarebytes' Anti-Malware in Vista the file you want is called rules.ref.
It's something called "AutoTune" and it spells death to good performance.
From a command prompt, enter the following:
netsh interface tcp set global rss=disabled
netsh int tcp set global autotuninglevel=disabled
Or download a script to do it for you here (right-click the hyperlink and "Save target as...")
152.2.21.1
128.118.25.3
WinIPcfg. (It's part of TWEAKUI_XP)
http://pogostick.net/~pnh/ntpasswd/
Since so many critical services are run with each svchost,
You can see which ones are being used by opening a cmd prompt and running:
tasklist /svc /fi "imagename eq svchost.exe"
Note: This is available only with XP Pro
By default, when you go to Network Places, it will scan and show shortcuts to previous network shares.
To turn this off and remove any current shortcuts
1. Open up the Windows Explorer
2. Go to Tools / Folder Options / View
3. The top section should be Files and Folders
4. Uncheck Automatically search for network folders and printers
5. Then go into Network Neighborhood Select all the previous network connections Delete them
6. Next time you look at the Network Neighborhood, they should not repopulate
Network Diagnostics scans your system to gather information about your hardware, software, and network connections.
Start / Run / NETSH DIAG GUI
The following is the type of information that can be displayed:
o Ping
o Connect
o Show
o Verbose
o Save to Desktop
o Mail Service
o News Service
o Internet Proxy Server
o Computer Information
o Operating System
o Windows Version
o Modems
o Network Clients
o Network Adapters
o Domain Name System (DNS)
o Dynamic Host Configuration Protocol (DHCP)
o Default Gateways
o Internet Protocol Address
o Windows Internet Naming Service (WINS)
If you prefer to use the classic search style in Explorer,
1. Start Regedit
2. Go to HKEY_CURRENT_USER\Software\Microsoft\Windows\CurrentVersion\Explorer\CabinetState
3. Add a String Key called Use Search Asst
4. Give it a value of no
The follow are some common Control Panel Applets that are located in the
\windows\system32 directory.
If you find yourself using any of these frequently, then you can simply make
shortcuts to them on your desktop.
|
appwiz.cpl |
Add/Remove Programs |
|
desk.cpl |
Display Properties |
|
diskmgmt.msc |
Disk Manager |
| eventvwr.msc | Event Viewer |
|
firewall.cpl |
Firewall Settings |
|
inetcpl.cpl |
|
|
mmsys.cpl |
Sound and Audio |
|
ncpa.cpl |
Network Connections |
|
nusrmgr.cpl |
User Accounts |
|
powercfg.cpl |
Power Options |
| services.msc | Services Applet |
|
sysdm.cpl |
System Properties |
| tasksched.msc | Task Scheduler |
|
wscui.cpl |
Security Center |
|
wuaucpl.cpl |
Automatic Updates Configuration |
If you mistakenly deleted the icon for the Desktop on the Quicklaunch toolbar
Go to C:\Documents and Settings\user_name\Application Data\Microsoft\Internet
Explorer\Quick Launch
(where user_name is replaced by your login name)
Create a Text file called ShowDesktop.SCF with the following contents:
[Shell]
Command=2
IconFile=explorer.exe,3
[Taskbar]
Command=ToggleDesktop
You can also DOWNLOAD a file, uncompress it, and copy to the toolbar or wherever you would like.
WindowsXP has a new feature called Prefetch. This keeps a shortcut to
recently used programs.
However it can fill up with old and obsolete programs.
To clean this periodically go to:
If you use the standard NT style of login and want to hide the last user:
If after you remove CD Burning software, you can no longer access your CD
ROM drive,
the following registry keys need to be deleted:
Locate and delete the UpperFilters and LowerFilters values under the following key in the registry:
HKEY_LOCAL_MACHINE\SYSTEM\CurrentControlSet\Control\Class\{4D36E965-E325-11CE-BFC1-08002BE10318}
Restart the computer
If you want to use the classic search engine in the Internet Explorer
If you want to log in as Administrator, but it is not showing on the Welcome screen,
If you want to open a command prompt to a directory that is selected in the Explorer:
Copy the following lines and paste them in Notepad:
Windows Registry Editor Version 5.00

[HKEY_CLASSES_ROOT\Directory\shell\cmdprompt]
@="@shell32.dll,-8506"
"NoWorkingDirectory"=""

[HKEY_CLASSES_ROOT\Directory\shell\cmdprompt\command]
@="cmd.exe /s /k pushd \"%V\""

[HKEY_CLASSES_ROOT\Directory\Background\shell\cmdprompt]
@="@shell32.dll,-8506"
"NoWorkingDirectory"=""

[HKEY_CLASSES_ROOT\Directory\Background\shell\cmdprompt\command]
@="cmd.exe /s /k pushd \"%V\""

[HKEY_CLASSES_ROOT\Drive\shell\cmdprompt]
@="@shell32.dll,-8506"
"NoWorkingDirectory"=""

[HKEY_CLASSES_ROOT\Drive\shell\cmdprompt\command]
@="cmd.exe /s /k pushd \"%V\""
Save Notepad file with a .reg extension and then double-click on it to modify the registry OR...
Download Windows 10 .reg file for Command Window Here (Right-click and Save As...)
Download script file here (Right-click and Run or Save As...)
Uninstalls anything.
Install application here.
This gives the system greater than 2GB of work space. If your system is not suffering, do not use this fix.
In the Boot.ini, specify this parameter on the boot line:
multi(0)disk(0)rdisk(0)partition(1)\WINDOWS="Microsoft Windows XP Professional" /noexecute=optin /fastdetect /3gb
Server 2003:
multi(0)disk(0)rdisk(0)partition(2)\WINNT="Microsoft Windows Server 2003" /fastdetect /3GB /Userva=3030
(Windows XP)
1.Start Registry Editor. (Start / Run / Regedit)
2.Locate and then click the following registry subkey:

HKEY_LOCAL_MACHINE\System\CurrentControlSet\Control\TerminalServer\WinStations\RDP-Tcp\PortNumber

3.On the Edit menu, click Modify, and then click Decimal.
4.Type the new port number, and then click OK.
5.Quit Registry Editor.
6.Restart the computer.
Note When you try to connect to this computer by using the Remote Desktop connection, you must type the new port.
You have to set the firewall to allow the new port number before you connect to this computer by using
the Remote Desktop connection.
To connect to a remote computer which is configured with the non-default TCP port:
1. Launch the Remote Desktop Protocol (RDP) client
2. Type the network resolvable name or IP address in the "Computer:" field followed by ":<the_port_number>"
Example:
http://support.microsoft.com/kb/306759
http://support.microsoft.com/kb/247501
Locate and click the following registry key:
HKEY_LOCAL_MACHINE\Software\Microsoft\Windows\CurrentVersion\Uninstall
Each key under Uninstall represents a program that appears in Add/Remove Programs. To determine which program that each key represents, click the key, and then view the following values:
DisplayName - the value data for the DisplayName key is the name that is listed in Add/Remove Programs
-and-
UninstallString - the value data for the UninstallString key is the program that is used to uninstall the program
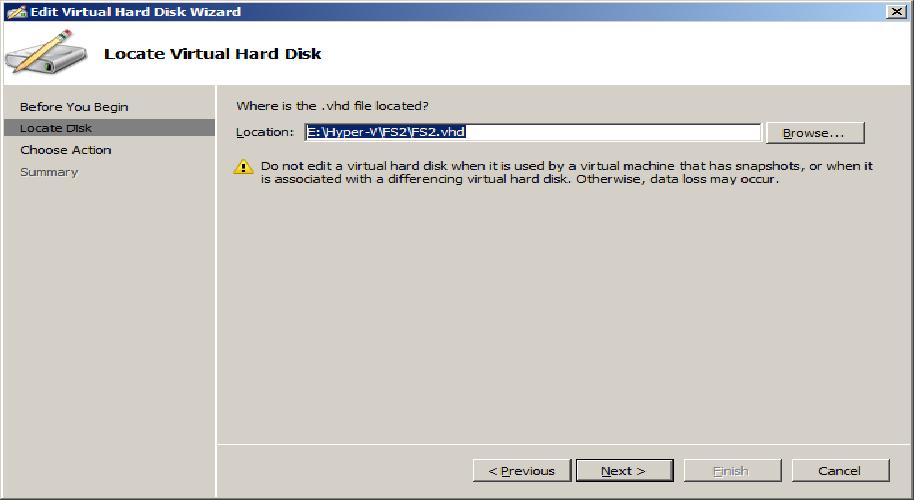
If your P2V attempt fails with Error 2910, I've used this method to get it to
succeed.
Add the following registry key to the prospective guest server (i.e. the
server to be P2V'd):
HKLM\SOFTWARE\Microsoft\Ole
Add String Value (REG_SZ):
EnableDCOM
with Value Data: Y
Text file contains the exit codes for robocopy. Download text file here.
Download Robocopy here. This
32-bit version requires Windows 2003 Server, XP, 2000, or NT 4.0 but will run
under a 64-bit OS
Synchronize your Windows Server 2008 computer with an Internet NTP time
source AND make the server
the NTP authority for your domain.
First determine which domain controller is the FSMO server in your domain
from a command prompt, use:
netdom /query fsmo
On the FSMO server, do the following:
net stop w32time
w32tm /config /syncfromflags:manual /manualpeerlist:"0.pool.ntp.org, 1.pool.ntp.org, 2.pool.ntp.org"
w32tm /config /reliable:yes
net start w32time
w32tm /query /configuration
Or you can choose to run this script. Fix it for me: here
Before installing ANY Windows Updates, perform the following steps:
If you've already installed Hyper-V Integration Services on the
Windows 2000 install, please uninstall them. Reboot.
(On the restart, click Cancel as many times as necessary (around 3) to display
the Desktop
1) In the Hyper-V Manager, with the Win2000 VM shut down, remove
the Network Adapter.
2) In the Hyper-V Manager, Add Hardware -> Legacy Network Adapter.
Click OK
3) Start and Connect to the Windows 2000 VM. Logon as Administrator
4) Install IE6 SP-1 (Login for Full
version). Restart
5) Run Windows Updates. Shut Down
6) In the Hyper-V Manager, right-click the Win2000 VM and choose Settings
7) Remove the Legacy Network Adapter and Add Hardware -> Network
Adapter
8) Start and connect to the Win2000 VM.
9) Install the Hyper-V Integration Services. Restart
10) Run Windows Updates to install all the rest of the updates that apply.
Restart (as many times as suggested).
If you install the Windows Updates as instructed in this article, you will avoid the BSOD.
1. Stop the windows time service: open a command prompt and type "net stop
w32time".
2. Configure the machine to sync with an outside time source: type "net
time /setsntp:clock.isc.org "; this will set the machine to automatically
sync with one of the clock.isc.org's time servers. (You may specify any legal
network time protocol server on the Internet.)
3. To confirm this works type "w32tm -once -test -v" this will test
synchronization against the navy time server and display verbose output.
4. Sync with the clock time server: "w32tm -s"; check if you get a response
that looks something like "RPC to local server returned 0x6b5",
5. Start the w32time service: "net start w32time". Once you start the
service, check if the clock automatically sync with the clock time server.
***************Resolution***************
From a command line type:
net stop "Automatic Updates"
del C:\Windows\SoftwareDistribution\
net start "Automatic Updates"
After that, simply run windows update again.
From the following article:
http://social.technet.microsoft.com/Forums/en-US/exchangesvrantivirusandantispam/thread/b4a20f48-f1cb-4438-8ee2-7f357bed185c/
My suggestion is to use the following blacklists
zen.spamhaus.org
pbl.spamhaus.org (takes care of dynamic IPs)
bb.barracudacentral.org
ix.dnsbl.manitu.net
bl.spamcop.net
# combined.njabl.org (njabl.org is defunct do not use)
and, if you are using Exchange 2010 which supports DNS whitelists, to also use the following whitelists
swl.spamhaus.org
iadb.isipp.com
query.bondedsender.org
hul.habeas.com
rasdial "Connection Name" Username Password /Domain:"Domain Name"
net use q: \\Servername\Sharename
copy SourcePath q:\DestinationPath
net use q: /delete
rasdial "Connection Name" /Disconnect
Schedule a VPN connection using Task Scheduler
Using the Remote Desktop client usually lands you in a separate session on
the windows server. There are times, however, when you might want to be
able to connect to the
console directly instead of being in a separate session. This is how.
Start the remote desktop client from the command line or the Start/Run dialog
with this command:
mstsc /console
Newer versions of the RDP client (6.1 and higher) use the following syntax:
mstsc /admin
robocopy c:\ H:\Daily\Web\C_Drive /R:0 /XJ /MIR /A-:A
IE6 SP1 Full Download for 2000/XP (In a handy .zip file)
From the Exchange System Manager, right-click the Exchange Server to be accessed and choose Properties
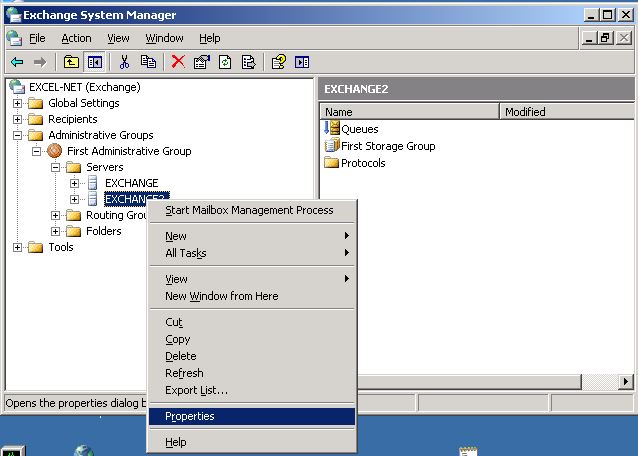
On the Security tab of the Exchange Server Properties dialog box click Domain Admins and check the Full Control checkbox.
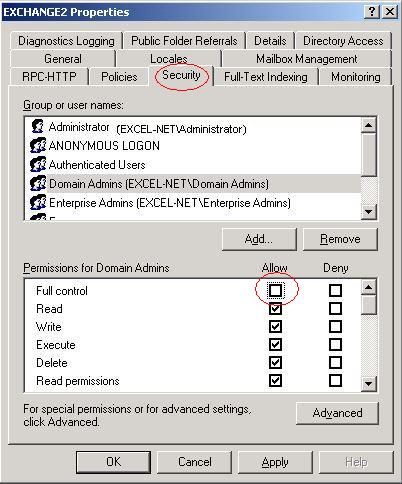
Click OK and the Domain Admins group will have Full Control access to all mailboxes on the server.
The network settings are assigned to an old network card. You should
have set the card to DHCP
before pulling it out of the computer. Failing that, this is the fix.
http://support.microsoft.com/kb/269155
Windows XP / Server 2003 / Server 2008 / Windows 7 -> MicrosoftFixit50609.msi
(See article for the Windows 8 / Server 2012 fix)
Best article is found above. Follow it.
Windows Installer will not work under Safe Mode, this means that programs cannot be installed or
uninstalled in safe mode without giving a specific command using msiexec in command prompt.

To make Windows Installer work under safe mode, you need to create a registry entry for every type
of safe mode you are logged in to.

1.Safe Mode
Type this in a command prompt:
	REG ADD "HKLM\SYSTEM\CurrentControlSet\Control\SafeBoot\Minimal\MSIServer" /VE /T REG_SZ /F /D "Service"

and then

	net start msiserver

This will start the Windows Installer Service.

2.Safe Mode with Networking

	REG ADD "HKLM\SYSTEM\CurrentControlSet\Control\SafeBoot\Network\MSIServer" /VE /T REG_SZ /F /D "Service"

and followed by

	net start msiserver

This will start the Windows Installer Service.
https://www.itechtics.com/download-internet-explorer-all-versions/
To edit a website under IIS5, make the following change to the registry
(believe it or not)
HKLM\System\CurrentControlSet\Control\LSA\MSV1_0
Enter the name of the website then it will allow you to authenticate and edit it
in FrontPage. Unbelievable...
See this KB article: https://support.microsoft.com/en-us/kb/896861
If you're using Office 365 for business, the IMAP or POP server name is
outlook.office365.com.
In the Outgoing mail server (SMTP) box, type the full name of the server for
your email provider. For example, mail.contoso.com.
If you're using Office 365 for business, the SMTP server name is
smtp.office365.com.
Since so many critical services are run with each svchost,
You can see which ones are being used by opening a cmd prompt and running:
tasklist /svc /fi "imagename eq svchost.exe"
Note: This is available only with XP Pro
www.favicon.cc - Creates a favicon.ico file
<link rel="shortcut icon" href="favicon.ico" type="favicon/ico" />
netsh int ip reset
netsh winsock reset
iexplore.exe -extoff
net user administrator /active:yes
FORFILES /P %WINDIR%\servicing\Packages /M Microsoft-Windows-InternetExplorer-*11.*.mum /c "cmd /c echo Uninstalling package @fname && start /w pkgmgr /up:@fname /quiet /norestart"
Reset Internet Explorer Proxy (Registry)
To reset your Internet Explorer proxy settings yourself, follow these steps:
In the Run text box, copy (CTRL+C) and paste (CTRL+V) or type the following:
Reg add "HKCU\Software\Microsoft\Windows\CurrentVersion\Internet Settings"
/v ProxyEnable /t REG_DWORD /d 0 /f
Click OK.
In the Run text box, copy (CTRL+C) and paste (CTRL+V) or type the following:
Reg delete "HKCU\Software\Microsoft\Windows\CurrentVersion\Internet
Settings" /v ProxyServer /f
Click OK.
Navigate to the following registry key:
Delete the values IconStreams and PastIconsStream.
Reboot (or restart Explorer.exe)
Windows XP: C:\Documents and Settings\%USERNAME%\Application
Data\Microsoft\Signatures
Windows Vista, 7, 8, 8.1, 10: %userprofile%\AppData\Roaming\Microsoft\Signatures
%AppData%\Microsoft\UProof\CUSTOM.DIC
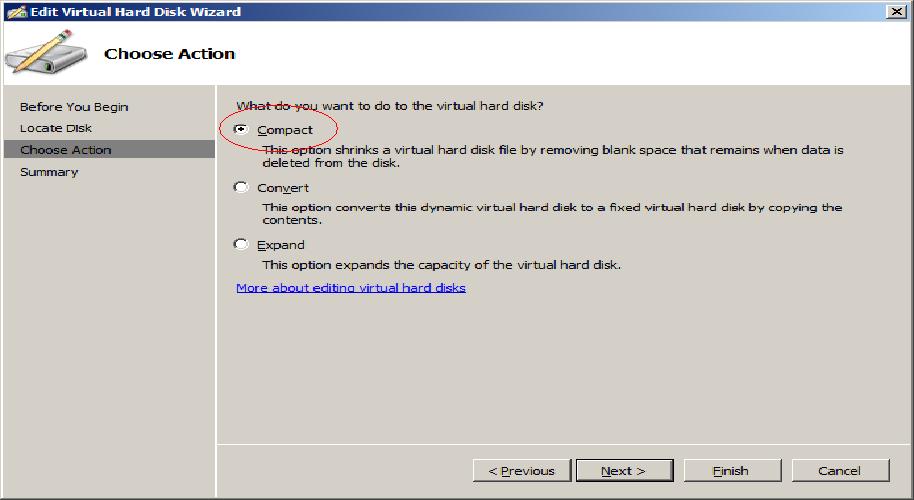
Problem: Cannot delete partitions with Disk Manager.
Solution: DiskPart.exe
As a command line utility, DiskPart is a little bit harder for average users to understand due to its non-graphical interface. So please be very careful when you want to delete EFI partition with Diskpart command line:
Shortcut Step:
Instead of doing all that business below, you can
easily "clean"
the disk with the following commands:
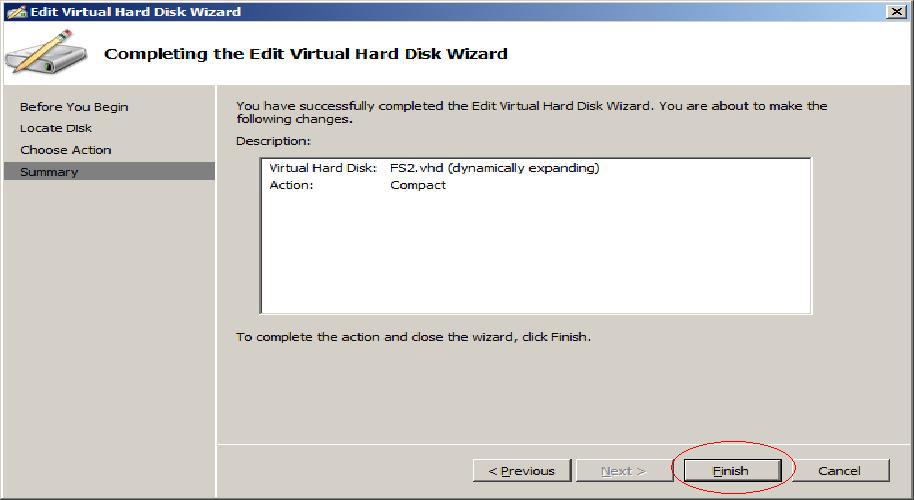
Open Diskpart in an elevated CMD prompt
Type
Done!
Type the below command lines and hit Enter each time:
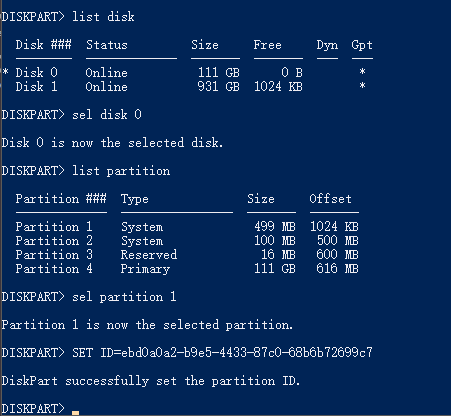
Type the below command lines and hit Enter each time:
Finally, type "exit" to close the windows when you receive the message says, 'DiskPart successfully deleted the selected partition'.
Launch PowerShell and enter the following command:
Set-SmbServerConfiguration -EnableSMB1Protocol $true
To disable, change $true to $false
Steps to enable and disable the SMBv1 on the SMB server using the registry:
Registry
subkey:
HKEY_LOCAL_MACHINE\SYSTEM\CurrentControlSet\Services\LanmanServer\Parameters
Registry entry: SMB1
REG_DWORD: 0 = Disabled
REG_DWORD: 1 = Enabled
Default: 1 = Enabled
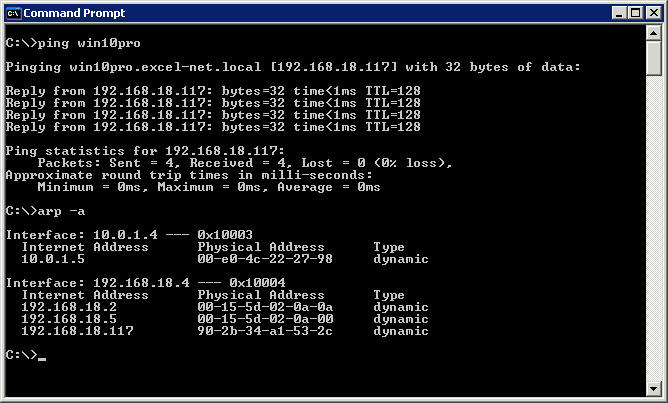
This will give you the MAC addresses (or Physical Address) of all the IP addresses your computer currently has in memory